
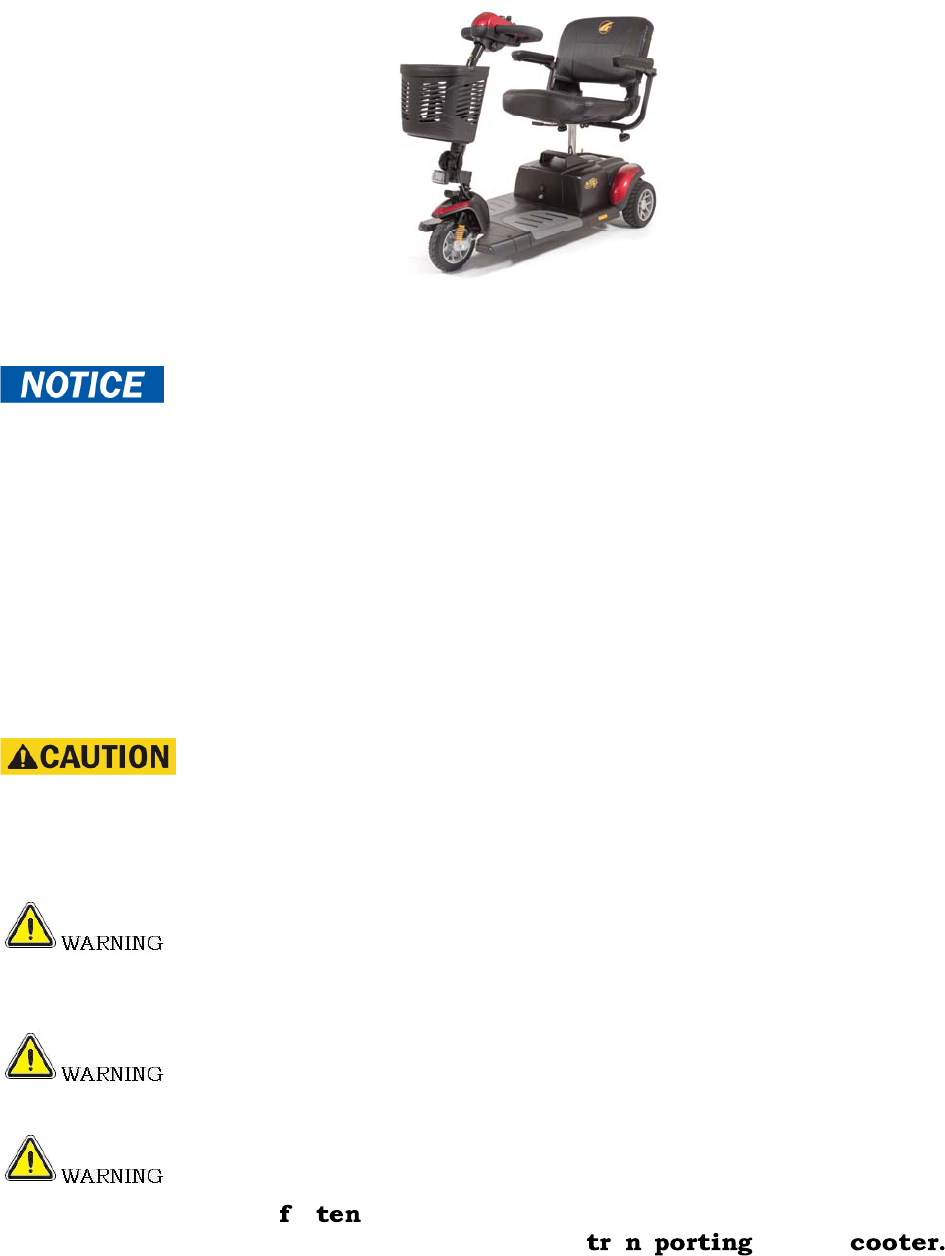
Owner’s Manual
Buzzaround XL™ Series
Golden Technologies - 401 Bridge Street - Old Forge, PA 18518 - Tel: 800-624-6374 - Fax: 800-628-5165 - www.goldentech.com
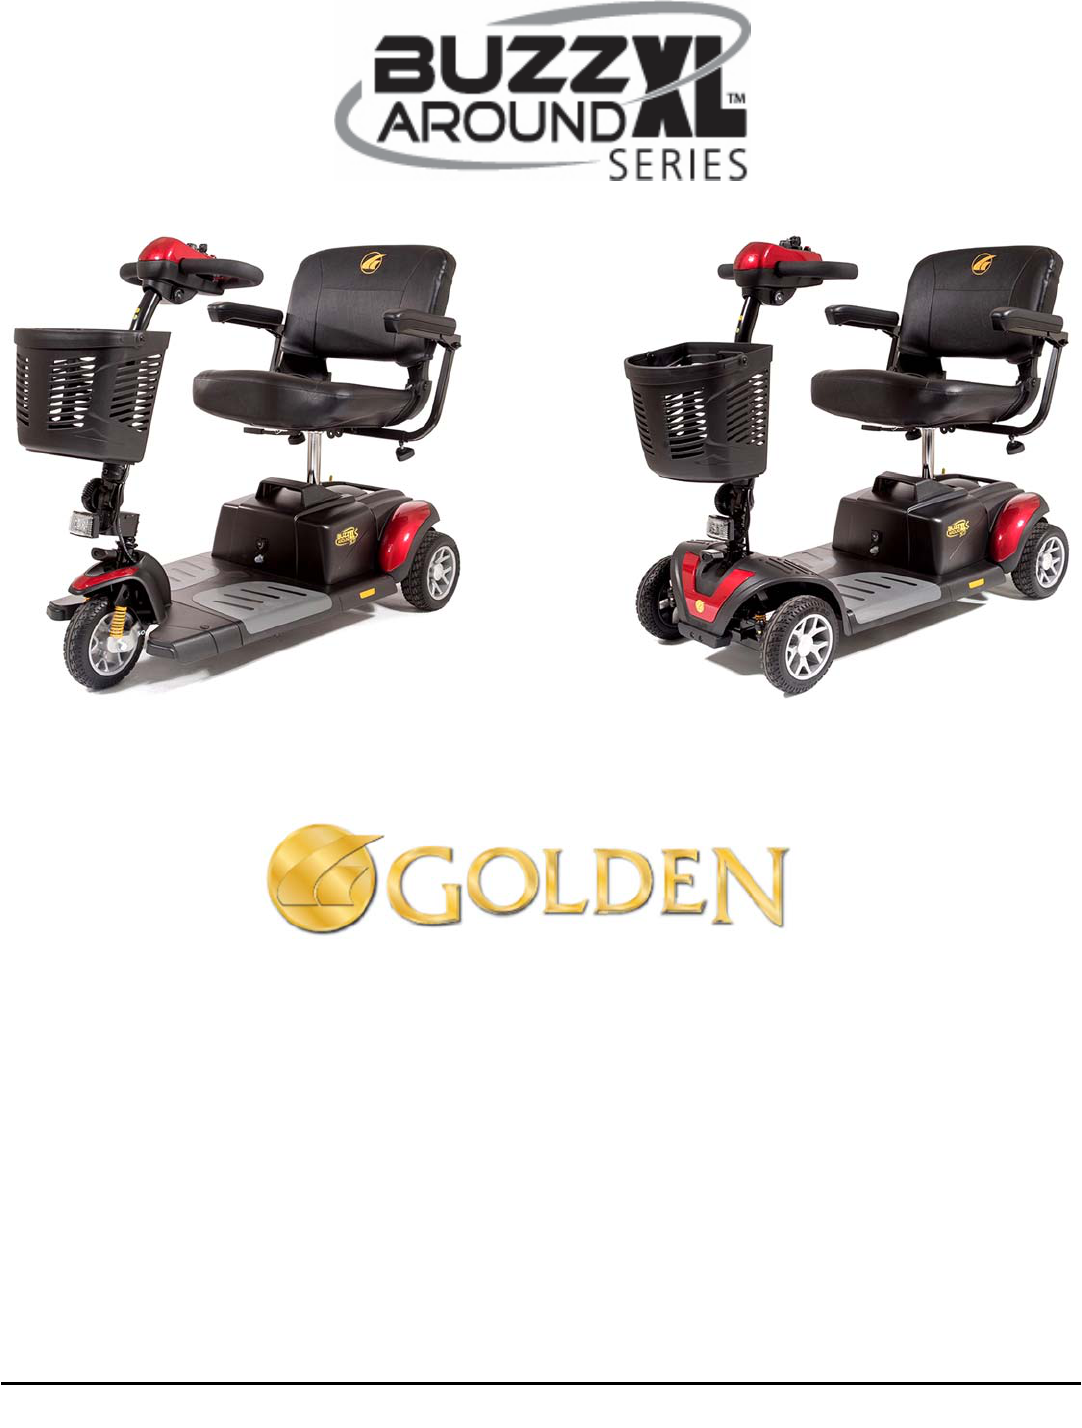
GB117 GB147

2

3
Thank you for purchasing your Buzzaround XL™ Scooter. We are honored you have
chosen Golden Technologies for your mobility needs.
Buzzaround XL™ Series
Models: GB117, GB147,
GB117HD/GB117SHD,
GB147HD/GB147SHD
Standard Packing List:
1 Owner’s Manual
1 Battery Pack
1 Front Basket
1 Seat with Armrest
1 Safety Flag
2 Keys
Battery Charger
Seat Post Nut and Bolt
DISCLAIMER
We ask that you read this manual completely before operating your new
Buzzaround XL™. Golden Technologies, Inc. is not and cannot be held responsible for
any damage or injury incurred due to improper or unsafe use of the Golden Buzzaround
XL™ scooter. Golden Technologies, Inc. specifically disclaims responsibility for any bodily
injury or property damage that may occur during any use that does not comply with
applicable federal, state, or local laws or ordinances.
4
Intended Use: The intended use of the Buzzaround XL is to provide mobility
to persons limited to a seated position that are capable of operating an
electric scooter.
CONTENTS
I. INTRODUCTION......................................................……………………………………5
Features and Benefits...…………………………………………………………………………..6
Accessories for the Buzzaround XL™ Scooter……………………………………………….7
II. SAFETY……………………………………………………………………………………….8-12
III. EMI/RFI..………………………………………………………………………………………13
IV. YOUR GOLDEN Buzzaround XL™……………………………………………………….14
Specifications………………………………………………………………………………….15-16
V. OPERATION..…………………………………………………………………………………..17
Control Panel..………………………………………………………………………………..17-18
Control Options.………………………………………………………………………………….18
Seating..………………………………………………………………………………………..19-20
Freewheel Mode.………………………………………………………………………………….21
VI. RIDING YOUR Buzzaround XL™ Scooter.……………………………………………..22
Mounting..………………………………………………………………………………………….22
Basic Driving.……………………………………………………………………………………..23
Steering in Tight Spots..……………………………………………………………………24-25
VII. DISASSEMBLY…………………………………………………………………………..26-27
VIII. ASSEMBLY………………………………………………………………………………28-31
IX. TRANSPORTING YOUR Buzzaround XL™..……………………………………………32
X. CARE AND MAINTENANCE..……………………………………………………………….33
Routine Maintenance..…………………………………………………………………………..33
Cleaning Your Buzzaround XL™ Scooter..………………………………………………….33
Batteries and Charging..………………………………………………………………………..34
If Your Buzzaround XL™ Does Not Operate........…………………………………………35
Diagnostics...………………………………………………………………………………….36-38
XI. WARRANTY...……………………………………………………………………………..39-40
Warranty/Registration Card........................……………………………………………….41
5
I. INTRODUCTION
Congratulations on the purchase of your new Buzzaround XL™ scooter. The Buzzaround
XL™ combines cutting edge technology with attractive designs that are also highly
functional in today’s world. We at Golden Technologies, Inc. know that you have chosen
a scooter that will give you years of dependable operation and also will enhance the
quality of your life by providing you with the mobility to experience an active daily
lifestyle.
Even though your new Buzzaround XL™ is both user-friendly and designed for
maximum maneuverability in even the tightest spaces, we ask that you please read,
understand and follow all of the instructions and suggestions in this manual before you
operate your scooter for the first time. The safe use of your new scooter is very important
to us.
If you feel that you do not understand the instructions and suggestions presented in this
owner’s manual, or if, for any reason, you do not feel capable of performing the activities
necessary to assemble, disassemble, operate, or maintain your Buzzaround XL™, please
contact your local Golden Technologies, Inc. provider or call Golden Technologies, Inc.
Technical Support Services at (800) 624-6374.
Golden Technologies, Inc. cannot be held responsible for personal injury or property
damage resulting from the unsafe or the improper use of any of our personal mobility
products. Also, Golden Technologies, Inc. cannot be held responsible for personal injury
or property damage resulting from attempts to follow instructions, suggestions, and
guidelines presented in this owner’s manual.
Our Research and Development Department, our Quality Control Department, and our
Engineering Department have used the latest product specifications and the latest
product design information to manufacture your Buzzaround XL™. Golden Technologies,
Inc. reserves the right to implement changes into our product lines when those changes
become desirable or necessary. If changes are implemented into our product line, there
may be minor differences between the product you purchased and the illustrations and
instructions in this owner’s manual.
Please fill out and mail the enclosed warranty registration card. Registration is also
available @ www.goldentech.com. We at Golden Technologies, Inc. would appreciate
hearing about the dependability of your Buzzaround XL™ and about the convenience of
mobility it has provided for you. We would also appreciate hearing about the service you
received from your local Golden Technologies, Inc. provider or representative.
Golden Technologies, Inc. Phone: (570) 451-7477
401 Bridge Street Fax: (570) 451-7494
Old Forge, PA 18518 Toll free: (800) 624-6374
For more information about our products and services or to send us your comments,
please visit our website at www.goldentech.com

6
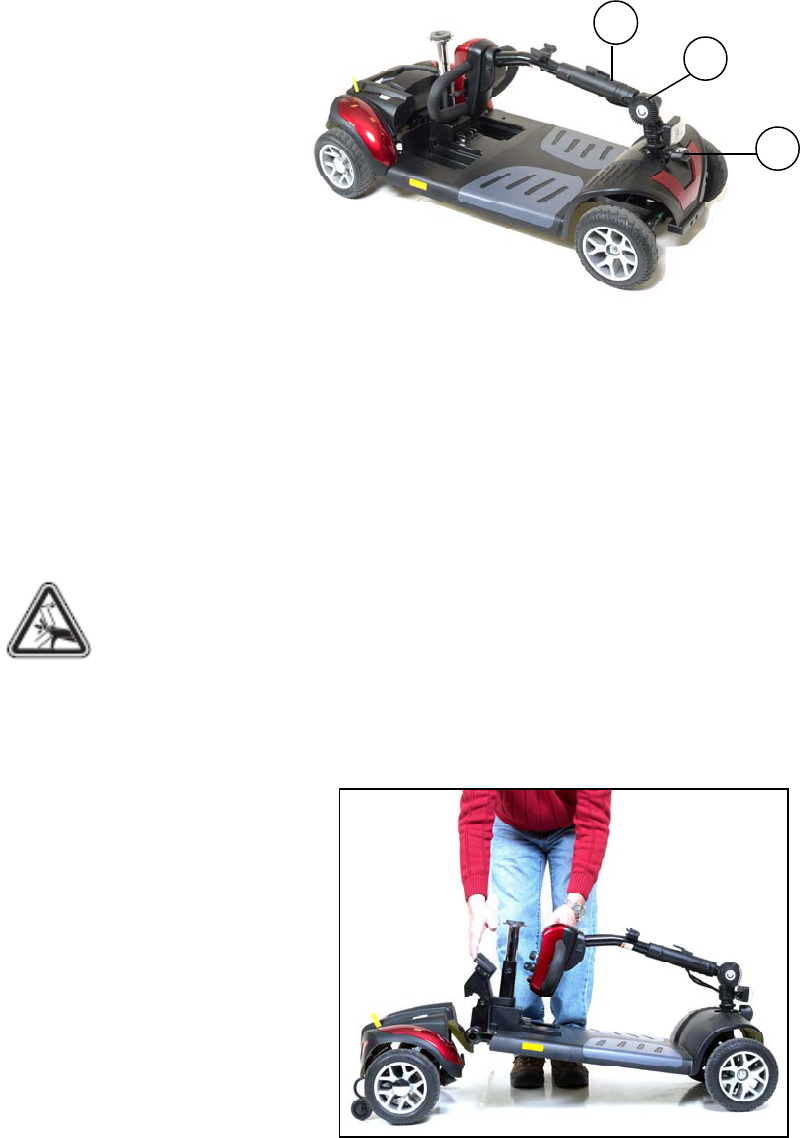
FEATURES AND BENEFITS
Your Buzzaround XL™ scooter has been designed with your comfort in mind. It has also
been designed to be a safe method of transportation when safety and operating
instructions are followed. Please review the features and benefits of certain components
of the Buzzaround XL™ scooter below.
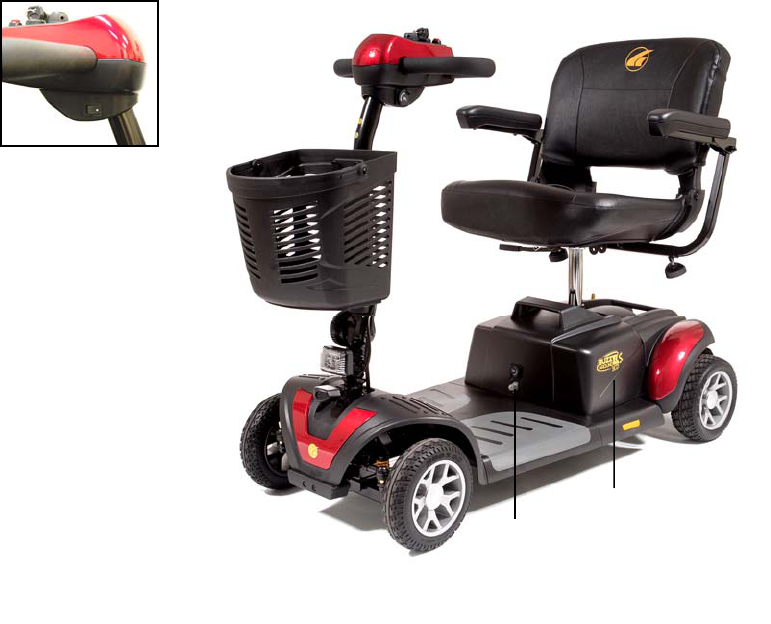
Figure 1. Buzzaround XL™ Features (Model: GB117SHD)
Control Panel:
Easy to read display features
from top to bottom: the LED
battery gauge; oversized speed
control knob; key switch to
turn the unit on and off; and
the red horn button.
Delta Tiller handle:
Offers rubber coated hand rests for
comfort and dual throttle control
levers for easy right or left hand use.
Seat Swivel:
A standard feature,
the seat can swivel to
the left or right for
easy transfers or to sit
more comfortably at a
table or desk.
Adjustable Armrests:
Your Buzzaround XL
scooter features width
and angle adjustable
armrests to find the
most comfortable
position as well as to
make transfers easier.
Easy Access Battery Pack:
Located under the seat, the battery pack has a
wireless connector system for easy disassembly
and reassembly. The battery pack can be re-
moved and brought indoors for charging with its
off board charger.
Basket:
The Buzzaround XL
comes standard
with a removable
storage basket.
LED Headlight:
The Buzzaround XL
comes standard with a
LED angle-adjustable
headlight, which is
designed to make it
easier to see and be
seen.
Tiller:
Easy to use tiller
offers multiple
adjustments to
find your most
comfortable driving
position. The Tiller
Adjustment Knob
is located at the
bottom of the tiller
on the right side.
Tiller Lock Knob:
Located at the
bottom of the tiller
in the front so that
you can lock the
tiller in place when
disassembled.
Headlight On/Off Switch:
The switch is located on the
right side of the tiller under
the control panel.
7
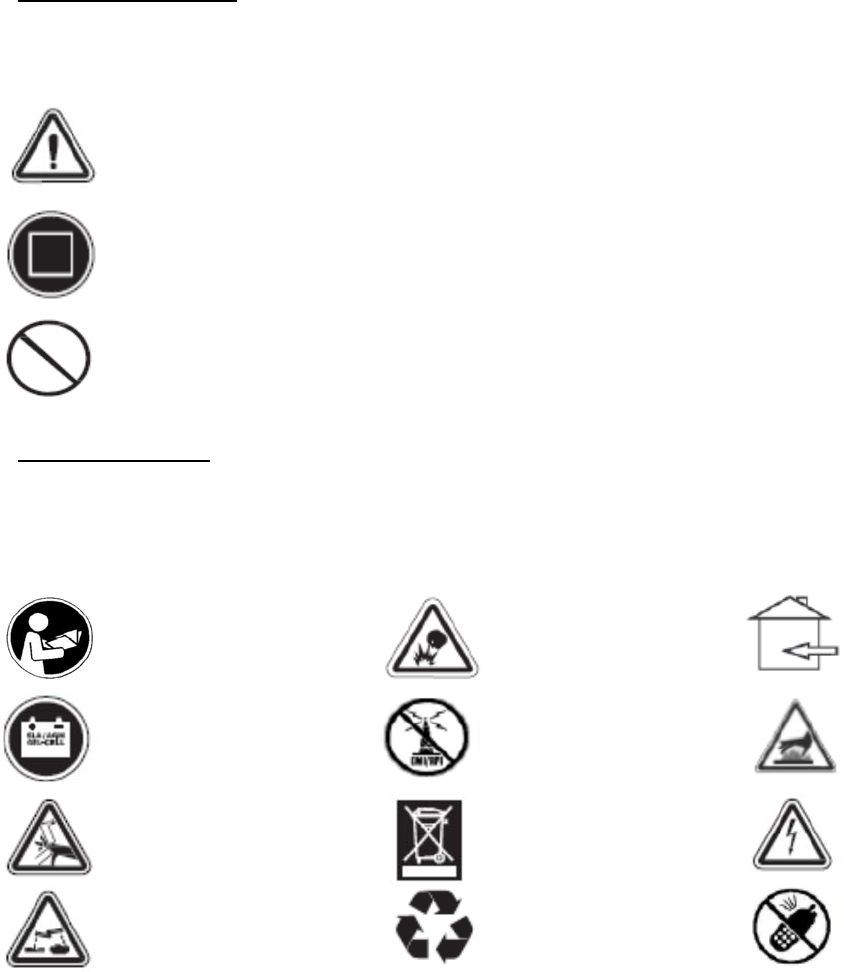
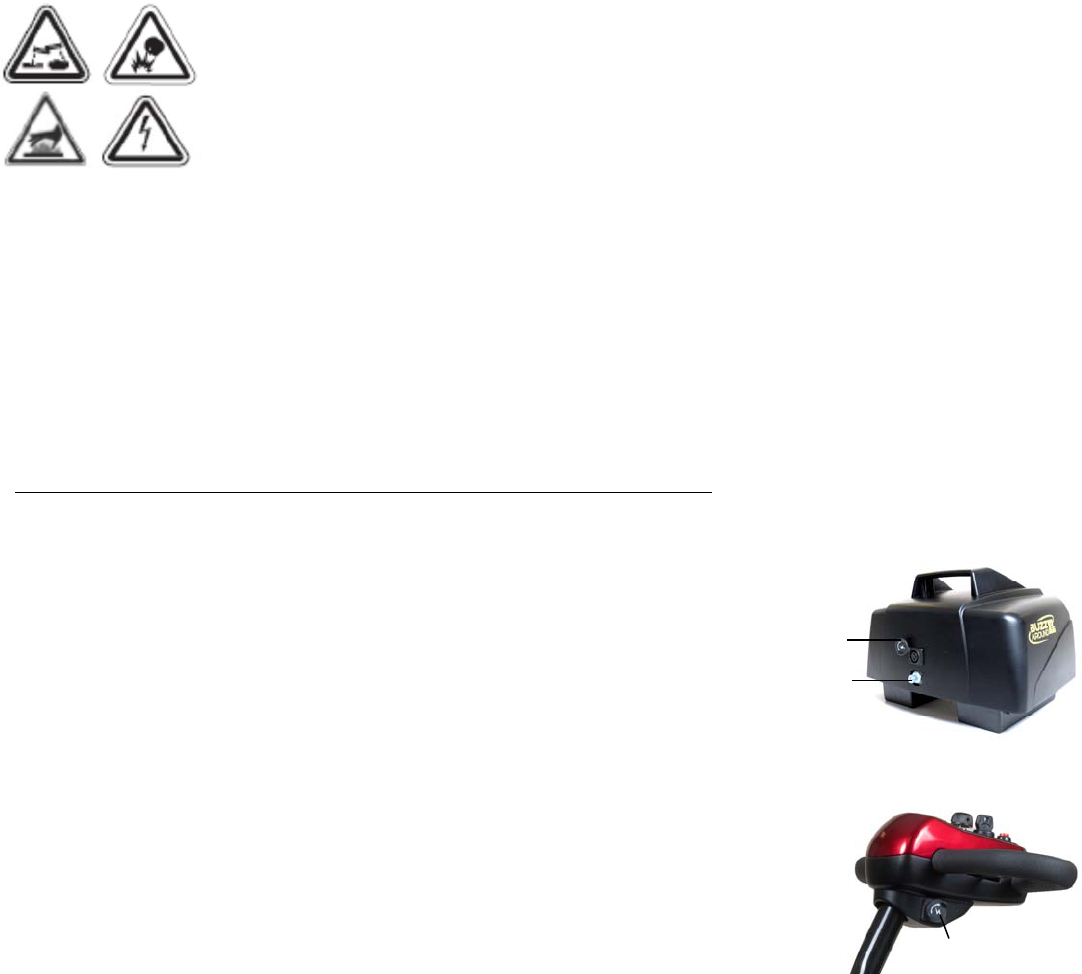
Read and follow the Explosive conditions Indoor use only!
owner’s manual! exist!
Use only AGM or
Gel-Cell batteries! Avoid transmitters! Hot surface!
Pinch/Crush Hazard! Do not place into trash! Electrical hazard!
Corrosive chemicals Recycle Do not use personal
inside battery! electronic devices!
I. INTRODUCTION
ACCESSORIES FOR THE BUZZAROUND XL™ SCOOTER:
A variety of accessories are available for your Golden Buzzaround XL™ Scooter. Please
contact your Authorized Golden Technologies Provider for more information or to order.
• Cane Holder - Tube
• Quad Cane Holder
• Walker Holder
• Oxygen Tank Holder
• Cup Holder
• Deluxe Pack N’ Go
• Forearm Crutch Holder
• Mirror
• Safety Flag
• Scooter Cover
• Travel Case
• 22 AMP Battery Pack
(Optional)
*Some accessories require a mounting bracket or mounting clips. Please check with your
provider to find out if the accessory you would like to order requires a mounting bracket
or mounting clips.
Safety Guidelines
The symbols below are used in the owner's manual and/or on the product to identify
warnings and to notify you of important safety information. Make sure you read and
understand them completely.
WARNING! Indicate(s) a hazardous situation which, if not avoided, could result
in death or serious injury. This icon is represented as a black symbol on a
yellow triangle with a black border.
MANDATORY! Failure to perform mandatory actions can cause personal in
jury and/or equipment damage. This icon is represented as a white symbol on
a blue dot with a white border.
PROHIBITED! Indicate(s) an action(s) that should not be performed under any
circumstance. Failure to adhere can cause personal injury and/or equipment
damage. This icon is represented as a black symbol with a red circle and red
slash.
Safety Symbols
The symbols below identify warnings, mandatory actions, and prohibited actions. They
can be found in the owner’s manual and/or on the product. Make sure you understand
all safety labels before operating the product. Do not remove safety labels from the
product.

8
II. SAFETY
Your Buzzaround XL™ is a battery-operated personal mobility vehicle. Please exercise
caution and consideration when you are operating it. Driving your Buzzaround XL
carefully and thoughtfully will help ensure your personal safety and the safety of other
people.
Before learning to operate your Buzzaround XL, have your authorized
Golden Technologies, Inc. provider determine if it is advisable for you to practice getting
on and off your scooter and operating it in the presence of an attendant.
MANDATORY! Read completely and understand this owner’s manual before
assembling, operating, transporting, or disassembling your Buzzaround XL
scooter.
BEFORE GETTING ON YOUR BUZZAROUND XL
• Check to be certain that the power is turned off. See section V. "Operation" in this
manual. This will eliminate the possibility of accidentally activating the paddle controls
and causing injury to yourself and/or others.
• Check to be certain that your Buzzaround XL’s freewheel lever is in the engaged
position. See section V. “Operation” in this manual.
• Flip up the armrests.
When getting on or off your Buzzaround XL, keep your weight
toward the middle of the deck. Putting most or all of your weight on the edge of
the deck may cause an unstable condition.
GETTING ON YOUR BUZZAROUND XL
• Position the seat for safe and easy mounting. Ensure that the seat is facing forward.
See Section V. "Operation."
• Return tiller to full upright position if necessary.
• Carefully place one foot on the approximate center of the deck and seat yourself
comfortably and securely on the seat.
• Flip down the armrest(s.)
GETTING OFF YOUR BUZZAROUND XL
• Make certain that the power is turned off and the key is removed.
• Return tiller to full upright position
• Flip up the armrests.
• Carefully place one foot on the ground, transfer your weight to that leg, and slowly
come to a standing position.
• Step away from the scooter.
MAXIMUM WEIGHT
Your Buzzaround XL has been rated to a maximum weight capacity (operator and
anything else being carried onboard) of 300 pounds. The HD models maximum weight
capacity is 325 pounds. Exceeding the maximum weight rating will void the warranty.
Exceeding the maximum weight rating may result in injury to
yourself and/or others.
9
II. SAFETY
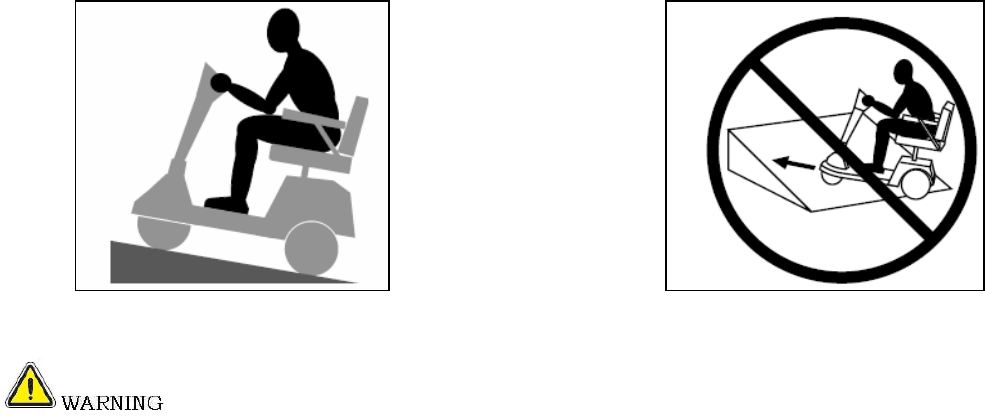
DRIVING ON INCLINES
• For maximum stability, lean forward in your Buzzaround XL’s seat while proceeding up
ramps, inclines, curbs, or any low rise. See figure 2.
• Drive with caution when attempting to negotiate any incline, even handicap access
ramps.
• Always climb or descend an incline by driving straight up or straight down the face of
the slope. See figure 2.
• Do not traverse or drive across the face of an incline in any direction. See figure 3.
• Do not attempt to negotiate an incline that is covered with snow, ice, salt, cut or wet
grass, leaves, or any other potentially hazardous material.
• Do not drive your scooter in reverse down an incline.
• Try to keep your Buzzaround XL moving when climbing an incline. If you do come to a
stop, restart and accelerate slowly and carefully.
• Do not try to descend or climb a slope whose gradient is greater than recommended.
*Buzzaround XL maximum recommended incline is 6°.
Figure 2. Going Up an Incline Figure 3. Traversing an Incline
If, while you are driving down a slope, your scooter starts to move
faster than you feel is safe, release the throttle control lever and allow your
Buzzaround XL to come to a stop. When you feel that you again have control of
your scooter, push the throttle control lever forward and continue safely down the
remainder of the slope.
DRIVING DOWN A DECLINE
• Lower speed setting.
• Whenever it is safely possible, drive forward down any ramp, low rise, or incline.
Golden Technologies, Inc. does not recommend that you drive your scooter in reverse
down any incline, ramp, curb, or low rise. Backing down any slope may create a very
hazardous situation. If it is necessary to back down a slope follow one of two procedures
on page 10.

10
II. SAFETY
When using either of the following procedures to back down a slope,
Golden Technologies, Inc. strongly advises that you have the assistance of another
person.
Procedure 1 - Under Power
1. Set the key switch to the “Off” position. See section V. “Operation.”
2. Turn the speed control dial fully counterclockwise to its slowest setting.
3. Dismount your Buzzaround XL™.
4. Set the key switch to the “On” position. See section V. “Operation.”
5. While standing alongside your scooter, carefully operate the controls at the lowest
speed setting. See section V. “Operation.”
6. Slowly and carefully back your scooter down the incline.
7. Carefully remount your Buzzaround XL and resume normal operation.
When your scooter is in freewheel mode, the park brake is released.
If the batteries are dead, the motor braking system will not work. The weight of the
scooter on a slope may cause you to lose control of the scooter. If you do not feel
capable of manually controlling your scooter down the slope, request assistance or
do not attempt to use this procedure.
Procedure 2 - Emergency (No Power)
1. Set the key switch to the “Off” position. See section V. “Operation.”
2. Dismount your Buzzaround XL™.
3. Set the freewheel lever to “Disengaged.”
4. While standing alongside the scooter, carefully manually maneuver it down the slope.
5. When you have reached a level surface at the bottom of the slope, position the
freewheel lever in the engaged position. See section V. “Operation.”
6. Carefully remount your Buzzaround XL, and set the key switch to the “On” position to
restore power.
Motor Braking System
Your scooter is equipped with a system that uses the motor to aid in braking. This motor
brake system is designed to work when the key is in either the on position or the off
position.
When the key switch is in the on position, the freewheel is in the engaged position, and
the scooter is under power, the motor will help slow down the scooter as soon as you
take your hand off of the throttle lever.
When the key switch is in the off position and the freewheel lever is in the disengaged
position, the motor brake system will keep you from pushing the scooter too fast (i.e.
down a slope).
You may notice this when pushing the scooter. The scooter will move freely until you
reach a certain speed. You will then encounter some resistance as the motor brake
system is activated.

11
II. SAFETY
MEDICATION
Always check with your physician to determine if any of the medications you are taking
may affect your judgment and/or your ability to operate your Buzzaround XL. Also check
with your physician concerning your physical ability to operate a scooter.
Do not connect or allow anyone except an authorized Golden
Technologies, Inc. provider to connect any electrical or mechanical device to your
Buzzaround XL. Unauthorized accessories will void the warranty and may cause
injury.
Please remember that while on your Golden Buzzaround XL, you are a
motorized pedestrian. You must observe and obey all pedestrian rules and regulations for
the locale in which you are riding.
Please use your Buzzaround XL™ scooter often and allow it to expand the horizons of
your daily life. The more mobility your Golden Buzzaround XL brings to you, the happier
you will be, and the more satisfied we at Golden Technologies, Inc. will be! But as with all
things, especially motor operated vehicles, observing a few rules and safety
considerations will help ensure safe scooter operation. So please follow the rules below.
RULES FOR USE AND OTHER SAFETY CONSIDERATIONS
Read completely and understand this owner's manual before
assembling, operating, transporting, or disassembling your Buzzaround XL.
• Always operate your Buzzaround XL with thought, care, and safety.
• Do not attempt to use your Buzzaround XL on an escalator. Always use an elevator.
• Do not carry passengers under any circumstances.
• Do not mount or dismount your Buzzaround XL unless the brake is engaged.
• Always make sure that the key switch is set to "Off" before mounting or dismounting
your scooter.
• Do not back your Buzzaround XL down an incline or across an uneven surface.
• Do not turn your scooter suddenly at full speed.
• Always make sure the seat is locked in the forward facing position before operating
your Buzzaround XL.
• Always come to a full stop before changing direction from forward to reverse or from
reverse to forward.
• Do not operate your Buzzaround XL where you could not safely or legally walk.
• Do not climb ramps or curbs that exceed your scooter's capacity.
• Always approach curbs and inclines straight on.
• Always be aware of and careful near mechanical pinch points especially when
assembling and disassembling your scooter.
• Never sit on your Buzzaround XL when it is being transported.
• Always fasten down your Buzzaround XL securely with an approved tie-down system
while transporting your scooter.
• Never operate your scooter if it is not functioning properly.

12
II. SAFETY
RULES FOR USE AND OTHER SAFETY CONSIDERATIONS - continued
Always use caution when driving on soft or uneven surfaces such as grass or gravel.
Also use caution on decks where there is no railing.
Never drive on the roadway, except when you must cross the street.
Always cross streets at intersections and use crosswalks or the most direct route,
making sure that your path is clear and that you are visible to motor traffic.
Never drive your Buzzaround XL up or down a step or curb that is higher than the
ground clearance listed on the specifications chart (see pages 15-16).
Never back up or down a step or curb.
Do not drive your Buzzaround XL in icy or salted conditions.
Never operate your Buzzaround XL while you are under the influence of alcohol.
Do not operate or store your Buzzaround XL where it will be exposed to rain, snow,
mist, and below freezing temperatures.
Should you encounter a problem with the operation of your
mobility device such as a mechanical or electrical problem immediately stop using
the product. Disconnect the batteries then contact the provider from whom you
purchased your mobility device for evaluation of the problem and repair if needed.

13
III. EMI/RFI
The rapid development of electronics, especially in the area of communications, has
saturated our environment with electromagnetic (radio) waves that are emitted by
television transmitters, cellular phones, citizen’s band radios (CBs), amateur radios (ham
radios), wireless computer links, microwave transmitters, paging transmitters, etc. These
electromagnetic (EM) waves are invisible and increase in strength the closer one gets to
the source of transmission. When these energy waves act upon electrical devices and
cause them to malfunction or to function in an erratic or uncontrolled manner, they are
referred to as Electromagnetic Interference (EMI) or Radio Frequency Interference (RFI).
EMI/RFI AND YOUR BUZZAROUND XL™
All electrically powered vehicles, including scooters are susceptible to Electromagnetic
Interference/Radio Frequency Interference (EMI/RFI). This interference could result in
abnormal, unintended movement of your Golden Buzzaround XL.
Unintended movement or brake release could cause an accident or
injury.
The FDA has determined that each make and model of scooter can resist EMI/RFI to a
certain level. The higher the level of resistance, the greater the degree of protection from
EMI/RFI—measured in volts per meter (V/m). The FDA has also determined that current
technology is capable of providing 20 V/m of resistance to EMI/RFI, which would provide
useful protection against common sources of interference. This product has been tested
and has passed an immunity level of 20 V/m.
EMI/RFI RECOMMENDATIONS
PROHIBITED! Do not turn on or use hand-held personal electronic
communication devices such as cellular phones, walkie-talkies, and CB
radios while your scooter is turned on.
• Be aware of any nearby transmitters (radio, television, microwave, etc.) on your
intended route and avoid operating your scooter close to any of those transmitters.
• Turn off the power if your Buzzaround XL is going to be in a stationary position for any
length of time.
• Be aware that adding accessories or components or modifying your scooter may make it
more susceptible to EMI/RFI.
• If unintended movement or park brake release occurs, turn your scooter off as soon as
it is safe to do so.
• Report all incidents of unintended movement or park brake failure to Golden
Technologies, Inc. Technical Service at (800) 624-6374.
Turn off your scooter as soon as it is safely possible if unintended or
uncontrollable motion occurs or if unintended park brake release occurs.
14
IV. YOUR GOLDEN Buzzaround XL™
Figure 4. Your Golden Buzzaround XL™ (Model GB147SHD)
FOR YOUR RECORDS
Please fill in your Buzzaround XL’s information below. This information will be useful in
the event that you ever need to contact Golden Technologies, Inc. concerning your
scooter.
Model ________________ Serial Number_________________________________________
Date of Purchase __________________ Body Color_______________
Provider Name________________________________________________________________
Company_____________________________________________________________________
Address_______________________________________________________________________
City ____________________________________ State________ Zip_____________________
Please remember to fill in and return your warranty registration card in the back of this
manual.
Headlight Switch
Control Panel
Hand Grip
Front Basket
Tiller Adjustment Knob
LED Headlight
Tiller Lock Knob
Circuit Breaker
Battery Pack
Freewheel Lever
Seat Assembly
Headlight Switch
Seat Rotation
Lever

15
IV. YOUR GOLDEN Buzzaround XL™
1. Battery range at 200 lbs., and will vary due to rider weight, drive surface, terrain, and battery type.
2. Electronics warranty excludes batteries.
3. Assembled weight calculated with the standard battery pack 2-12 AH batteries on non-HD models.
Literature is current at the time of printing. Golden Technologies reserves the right to make changes to the
product or literature at any time.
Specifications GB117 GB147
Medicare Code K0800 K0800
Weight Capacity 300 lbs. 300 lbs.
Drive Wheels Rear Rear
Maximum Speed 4 mph 4 mph
Operating Range
1
8 miles 8 miles
Ground Clearance Under Deck 3.0 in. 3.0 in.
Turning Radius 37 in. 47 in.
Type Batteries 2-12 AH 2-12 AH
Colors Red, Blue Red, Blue
Freewheel Mode Yes Yes
Electronic Speed Control Yes Yes
Electro-Mechanical Brakes Yes Yes
Charger Off-board Off-board
Controller 50 Amp 50 Amp
Length 42.5 in. 41.5 in.
Width 21.5 in. 21.5 in.
Height (ground to top seat back) 33-35 in. 33-35 in.
Ground to Top of Seat 21-23 in. 21-23 in.
Ground to Top of Deck 4.75 in. 4.75 in.
Deck to Top of Seat 16-18 in. 16-18 in.
Number of Seat Height Positions 3 3
Size of Increments 1.0 in. 1.0 in.
Front Axle to Rear Axle 33.5 in. 32 in.
Weight of Unit: (assembled)
3
102 lbs. 110 lbs.
Front Half 35 lbs. 43 lbs.
Rear Half 25 lbs. 25 lbs.
Seat with Arms 23 lbs. 23 lbs.
Batteries (pack with 2-batteries) 19 lbs. 19 lbs.
Tires:
Solid, low profile Solid, low profile
Front 8 in. 8 in.
Rear 8 in. 8 in.
Rear Anti-Tip Wheels 2 in. 2 in.
Standard Seat:
Stadium Style Stadium Style
Seat Back Height (no headrest) 16 in. 16 in.
Width x Depth 18” x 16” 18” x 16”
Color Black Vinyl Black Vinyl
Optional Seat:
Stadium Style Stadium Style
Seat Back Height (no headrest) 16.0 in. 16.0 in.
Width x Depth 20” x 18” 20” x 18”
Color Black Vinyl Black Vinyl
Warranty:
Frame Lifetime Warranty Lifetime Warranty
Drive Train 2 Year Warranty 2 Year Warranty
Electronics
2
2 Year Warranty 2 Year Warranty
Batteries 1 Year Warranty 1 Year Warranty

16
IV. YOUR GOLDEN Buzzaround XL™
1. Battery range at 200 lbs., and will vary due to rider weight, drive surface, terrain, and battery type.
2. Electronics warranty excludes batteries.
3. Assembled weight calculated with the standard battery pack 2-22 AH batteries on HD models.
Literature is current at the time of printing. Golden Technologies reserves the right to make changes to the
product or literature at any time.
Specifications GB117HD/GB117SHD GB147HD/GB147SHD
Medicare Code K0801/Not Coded K0801/Not Coded
Weight Capacity 325 lbs. 325 lbs.
Drive Wheels Rear Rear
Maximum Speed 4 mph 4 mph
Operating Range
1
14 miles 14 miles
Ground Clearance Under Deck 3.0 in. 3.0 in.
Turning Radius 37 in. 47 in.
Type Batteries 2-22 AH (standard) 2-22 AH (standard)
Colors Red, Blue Red, Blue
Freewheel Mode Yes Yes
Electronic Speed Control Yes Yes
Electro-Mechanical Brakes Yes Yes
Charger Off-board Off-board
Controller 50 Amp 50 Amp
Length 42.5 in. 41.5 in.
Width 21.5 in. 21.5 in.
Height (ground to top seat back) 33-35 in. 33-35 in.
Ground to Top of Seat 21-23 in. 21-23 in.
Ground to Top of Deck 4.75 in. 4.75 in.
Deck to Top of Seat 16-18 in. 16-18 in.
Number of Seat Height Positions 3 3
Size of Increments 1.0 in. 1.0 in.
Front Axle to Rear Axle 33.5 in. 32 in.
Weight of Unit: (assembled)
3
112 lbs./115 lbs. 120 lbs./123 lbs.
Front Half 35 lbs. 43 lbs.
Rear Half 25 lbs./28 lbs. 25 lbs./28 lbs.
Seat with Arms 23 lbs. 23 lbs.
Batteries (pack with 2-batteries) 29 lbs. 29 lbs.
Tires:
Solid, low profile Solid, low profile
Front 8 in. 8 in.
Rear 8 in. 8 in.
Rear Anti-Tip Wheels 2 in. 2 in.
Standard Seat:
Stadium Style Stadium Style
Seat Back Height (no headrest) 16 in. 16 in.
Width x Depth 18” x 16” 18” x 16”
Color Black Vinyl Black Vinyl
Optional Seat:
Stadium Style Stadium Style
Seat Back Height (no headrest) 16.0 in. 16.0 in.
Width x Depth 20” x 18” 20” x 18”
Color Black Vinyl Black Vinyl
Warranty:
Frame Lifetime Warranty Lifetime Warranty
Drive Train 2 Year Warranty 2 Year Warranty
Electronics
2
2 Year Warranty 2 Year Warranty
Batteries 1 Year Warranty 1 Year Warranty
17
V. OPERATION
Figure 5. Buzzaround XL™ Delta Tiller Control Panel
CONTROL PANEL
Speed Adjustment Dial
• The speed adjustment dial allows you to preselect the maximum top speed of your
Golden Buzzaround XL. See figure 5.
• Turn the dial counterclockwise to operate your scooter at the lowest speed level.
• Turn the dial clockwise to increase the operational speed of your scooter.
• We recommend that you select a speed setting at which you feel comfortable, safe, and
in control of your Buzzaround XL.
Key Switch
This switch turns the power on and off to your Buzzaround XL. See figure 5.
• Insert the key into the key switch.
• Turn the key 90 degrees clockwise to turn on your scooter's power. The LEDs on the
battery meter will light up indicating that power is on.
• Turn the key back to the vertical position to turn off your scooter's power.
Always make certain that the key is removed from the key switch before
getting on or off your Golden Buzzaround XL or before lowering the tiller completely.
Horn Button
Press this button to sound the horn. See figure 5.
Throttle
Control Lever
LED Battery
Meter
Speed
Adjustment
Key Switch
Horn Button

18
V. OPERATION
DC Battery Voltage Meter
This meter (see figure 5) shows the amount of voltage in your Buzzaround XL’s batteries.
• Green indicates a full charge on the batteries.
• Yellow indicates caution and approximately a one-half charge of the batteries.
• Red indicates that the batteries have less than one-half of a charge remaining.
See section X. “Care and Maintenance” for instruction concerning charging the batteries.
Delta Tiller Throttle Control Lever
The Delta Tiller enables you to use only one hand (either the right or left) to operate both
the speed and the direction of the Buzzaround XL. This self-centering lever system
controls your Buzzaround XL’s speed (up to the maximum speed set by the speed
adjustment dial) and its forward and reverse direction. See figure 5.
To drive forward use either of the following:
• Use your right hand fingers to pull back on the right side of the throttle control lever.
• Use your left thumb to push the left side of the throttle control lever.
Always bring your Buzzaround XL to a full stop before changing
direction from forward to reverse, or from reverse to forward.
To drive in reverse use either of the following:
• Use your left hand fingers to pull back on the left side of the throttle control lever.
• Use your right thumb to push the right side of the throttle control lever.
When the throttle control lever is completely released, it automatically returns to the
center “stop” position and engages your scooter’s brakes, bringing you to a complete
stop. You will hear a “click” when the park brake engages.
Control Options
Golden Technologies, Inc. has made provision for the individual needs and abilities of the
operators of the Golden Buzzaround XL.
Your authorized Golden Technologies, Inc. provider can reverse the throttle control lever
controls so that when you pull on the left side of the lever, your scooter will move in the
forward direction, and when you pull on the right side of the lever your scooter will move
in the reverse direction.
DELTA TILLER ADJUSTMENT
The tiller on your Buzzaround XL scooter employs an adjustment knob to provide you
with multiple tiller angle settings. To set the tiller to your liking, follow these directions.
1. Use one hand to grasp a handgrip.
2. Use your other hand to loosen the tiller adjustment knob. See figure 4 on page 14.
3. Position the tiller to a comfortable driving position.
4. Tighten the tiller adjustment knob.

19
V. OPERATION
SEATING
Figure 6. Armrest Width Adjustment Figure 7. Armrest Angle Adjustment
Armrest Width Adjustment
To adjust the armrest width:
1. Loosen the adjustment knobs at the rear of the seat. See figure 6.
2. Slide the armrests in or out to the desired width.
3. Tighten the adjustment knobs.
Be sure adjustments knobs are securely tightened against the
inserted armrest tube. Do not overextend the armrest.
Flip-up Armrests
Pull up on the end of either armrest to flip it up for easy transfer on and off your Golden
Buzzaround XL™. See #1 on figure 7.
Armrest Angle
Loosen the locknut by turning it counter-clockwise.
To increase the armrest angle, turn the armrest angle screw counterclockwise.
To decrease the armrest angle, turn the armrest angle screw clockwise.
See #2 on figure 7.
1
2
Locknut
20
V. OPERATION
Figure 8: Seat Rotation Adjustment
Seat Rotation Lever
The seat can be rotated through 360° and locked at any 45° position.
1. Pull up on the seat rotation lever and rotate the seat to the desired position.
See figure 8.
2. Release the handle to lock the seat at any 45° position.
Figure 9 Figure 10
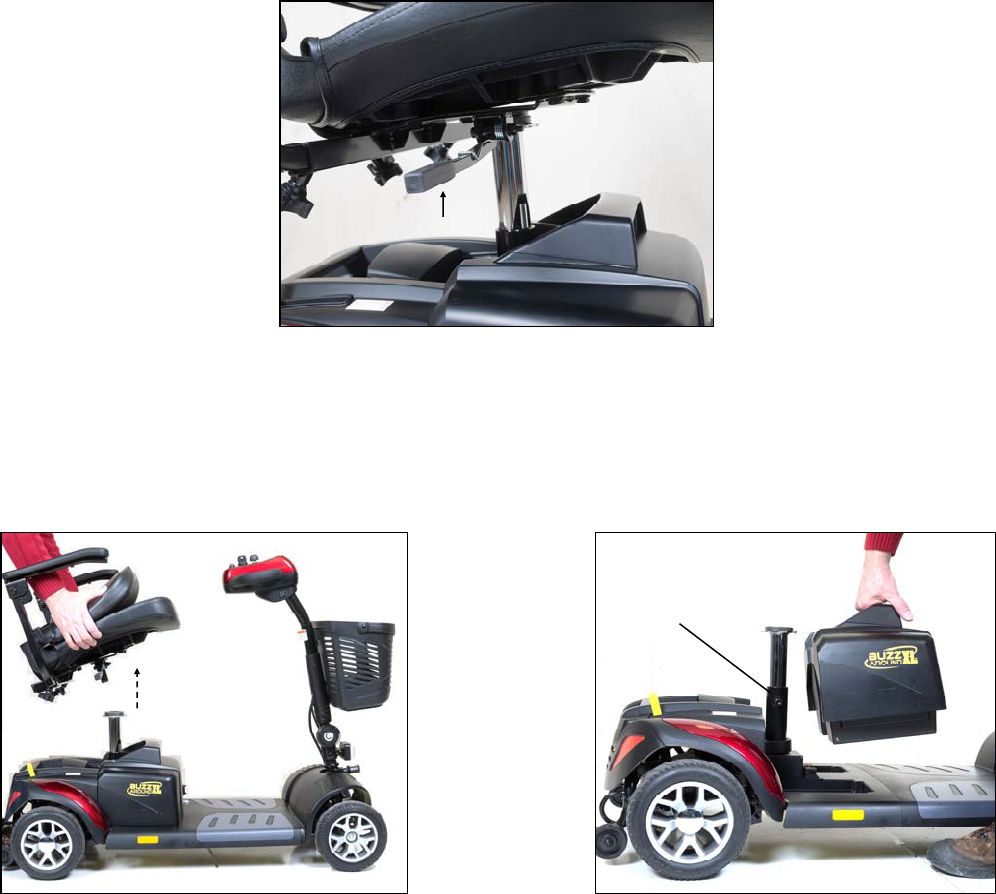
Seat Height Adjustment
To adjust the seat height:
1. Fold the seat back down, grasp the seat on both sides and lift the seat up and off of
the seat pedestal. See Figure 9. (Note: Seat arms can be removed to reduce the seat
weight).
2. Remove the battery box by lifting it up. See figure 10.
3. Remove the nut and bolt that holds the seat post in the seat pedestal.
4. Position the seat post at the desired height while aligning the holes in the seat post
and the seat pedestal.
5. Reinstall the nut and bolt.
6. Reinstall the battery box.
7. Place the seat back onto the seat post and push down to lock it into place. Move the
seat from side to side to make sure it is locked into place.
Nut and Bolt
21
V. OPERATION
Do not sit in or attempt to move your Buzzaround XL unless the
frame and rear carriage are securely engaged. Accidental separation of the frame
from the rear carriage may occur and cause injury or damage.
Never sit on your Buzzaround XL in freewheel mode.
Never disengage the park brake while you are operating your
Buzzaround XL.
Always make certain that your scooter park brake is engaged before
inserting the key into the key switch and turning it to the on position.
FREEWHEEL MODE
Your Buzzaround XL™ is equipped with a freewheel lever that can set your scooter in or
out of freewheel mode.
Figure 11: Freewheel Lever (Drive Position)
To disengage the park brake and put your scooter in freewheel mode:
Push forward on the freewheel lever towards the letter N (Neutral Position). See figure 11.
To engage the brake and take your scooter out of freewheel mode:
Pull back on the freewheel lever towards the letter D (Drive Position). See figure 11.
Pushing the scooter too quickly in freewheel will cause the motor to act as
a generator causing the scooter to become difficult to push. Freewheel slowly.
22
VI. RIDING YOUR Buzzaround XL™
MOUNTING
For your first driving session, make certain that your Buzzaround XL
starts out on a level surface and that you will continue driving on a level surface.
BEFORE GETTING ON YOUR BUZZAROUND XL™
1. Check to be certain that the key has been removed from the key switch. See section V.
"Operation" in this manual. This will eliminate the possibility of accidentally activating
the paddle controls and causing injury to yourself and/or others.
2. Check to be certain that your Buzzaround XL freewheel lever is in the engaged
position. See section V. “Operation” in this manual.
3. Flip up or remove the armrests.
When getting on or off your Buzzaround XL, keep your weight toward
the middle of the deck. Putting most or all of your weight on the edge of the deck
may cause an unstable condition.
GETTING ON YOUR BUZZAROUND XL™
1. Position the seat for safe and easy mounting. Ensure that the seat is facing forward.
See Section V. "Operation."
2. Return tiller to full upright position if necessary.
3. Carefully place one foot on the approximate center of the deck and seat yourself
comfortably and securely on the seat.
4. Flip down or replace the armrest(s).
5. Place the key into the key switch.
6. Rotate the key clockwise to the on position. See figures 12 and 13.
Figure 12. Key Switch (Off) Figure 13. Key Switch (On)

23
VI. RIDING YOUR Buzzaround XL™
BASIC DRIVING
1. Make certain that you are seated safely and properly on your Golden Buzzaround XL.
2. Turn the speed control dial fully counterclockwise to its slowest setting.
3. Insert the key into the key switch—if you have not already done so.
4. Turn the key clockwise to the “On” position. See figure 13 on page 22.
5. Place your hands on the handgrips.
• If you wish to drive forward, pull back on the right side of the throttle control lever (or
push the left side of the throttle control lever forward.)
• If you wish to drive in reverse, pull back the left side of the throttle control lever (or
push the right side of the throttle control lever forward.)
6. Pull on the throttle control lever to gently accelerate your Buzzaround XL.
7. Release the throttle control lever to allow your Buzzaround XL to come gently to a full
stop.
8. Practice these two basic functions until you feel that you have control of your scooter.
Steering
Steering your Golden Buzzaround XL is easy and logical.
1. With both hands on the handgrips of the tiller (see figure 4 on page 14), turn the tiller
to the right to travel to the right.
2. With both hands on the handgrips of the tiller (see figure 4 on page 14), turn the tiller
to the left to travel to the left.
3. Make certain to maintain sufficient clearance when turning your scooter so that the
rear wheels will clear any obstacle.
Turning your scooter too sharply at too high a speed may create
a situation where one of the rear wheels will leave the ground. This may increase
the possibility of tipping the scooter. Avoid this danger at all times by decelerating
and steering a wide arc around corners and obstacles.

24
VI. RIDING YOUR Buzzaround XL™
Steering in a Tight Spot
If you must steer in a tight spot, such as entering a doorway or when turning around:
1. Bring your Buzzaround XL to a full stop.
2. Set speed at the lowest setting.
3. Turn the tiller to the direction in which you wish to drive.
For more information on dealing with obstacles and tight spots, see “Control Through
Tight Spots” on the next page.
Steering in Reverse
Backing up your Buzzaround XL requires attention to what you are doing.
Use extreme caution when operating your scooter in reverse.
Plan your route to avoid getting into a difficult situation.
Make sure your proposed route is clear of people, pets, and obstacles.
1. Use your right fingers to push the throttle control lever or use your left fingers to pull
back on the throttle control lever. See figure 5 on page 17.
2. Turn the tiller to the left to drive in reverse to the left.
3. Turn the tiller to the right to drive in reverse to the right.
Your Buzzaround XL’s speed in reverse is fifty percent of the speed set at
the speed control dial.
Prevent injury! Do not drive down an incline in reverse.

25
VI. RIDING YOUR Buzzaround XL™
CONTROL THROUGH TIGHT SPOTS
As you use your Golden Buzzaround XL to greatly increase your mobility, you will
undoubtedly encounter some obstacles that will require practice to negotiate smoothly
and safely. Below are some common obstacles that you may meet during the daily use of
your scooter. Listed with those obstacles are some driving tips that should help you
conquer those obstacles. Learn and follow those tips, and with surprising ease you will
soon be in control of your Buzzaround XL as you maneuver it through doors, up and
down ramps, up and over curbs, through grass and gravel, and up and down inclines.
Ramps
When proceeding up any ramp, curb, or incline:
• Lean forward in your seat to move your center of gravity forward for maximum stability
and safety.
If the ramp has a switchback, good cornering ability is required.
• Maneuver your Buzzaround XL so that the front wheels take wide swings around the
corners of the ramp.
• Doing this will allow your scooter's back wheels to follow a wide arc around the corner,
staying clear of obstacles.
If you must stop your Buzzaround XL while driving up a ramp:
• Starting up again simply requires that you apply gentle and steady forward power
pressure to the throttle control lever.
• Accelerate gently after stopping on any incline.
Driving down a ramp:
• Keep your Buzzaround XL’s speed control dial set fully counterclockwise at the slowest
speed setting.
• If you must come to a stop, release the throttle control lever slowly and smoothly.
Prevent injury! Do not drive down an incline in reverse.
Curbs
• See specifications for maximum curb height.
• Always use caution when negotiating any curb.
• Go up or down a curb head on at a direct 90° angle.
• Approach and negotiate the curb so that both back wheels of your scooter go over the
curb at the same time.
• Never negotiate inclines or curbs by traversing them. Doing so may cause the scooter to
tip over.
• Go down a curb slowly to avoid a jarring bump. Use as little power as possible.
Grass and Gravel
Your Golden Buzzaround XL performs admirably on grass, gravel, and hills, but you
must follow the operational parameters presented in this manual. Refer to the “Safety”
section. If you are unsure about any situation, avoid it. Common sense is your best
protection.
• Feel free to use your Golden Buzzaround XL on lawns or in park areas.
• Avoid long or high grass, which may wrap around your scooter's axles.
• Avoid loose gravel.
26
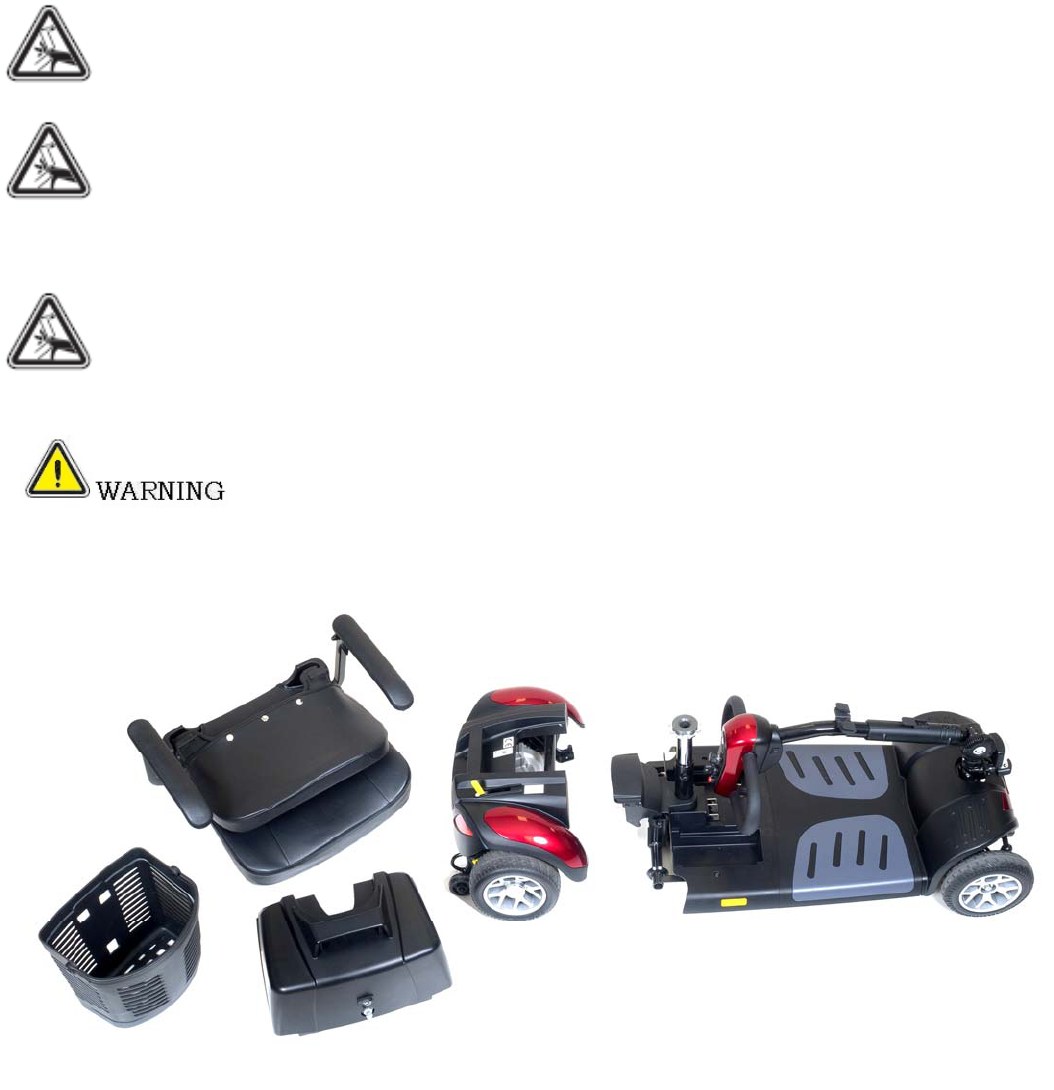
VII. DISASSEMBLY
DISASSEMBLY
Your Buzzaround XL scooter is designed to be disassembled easily in order to be
transported. When disassembling your scooter, please be sure to follow these simple
instructions.
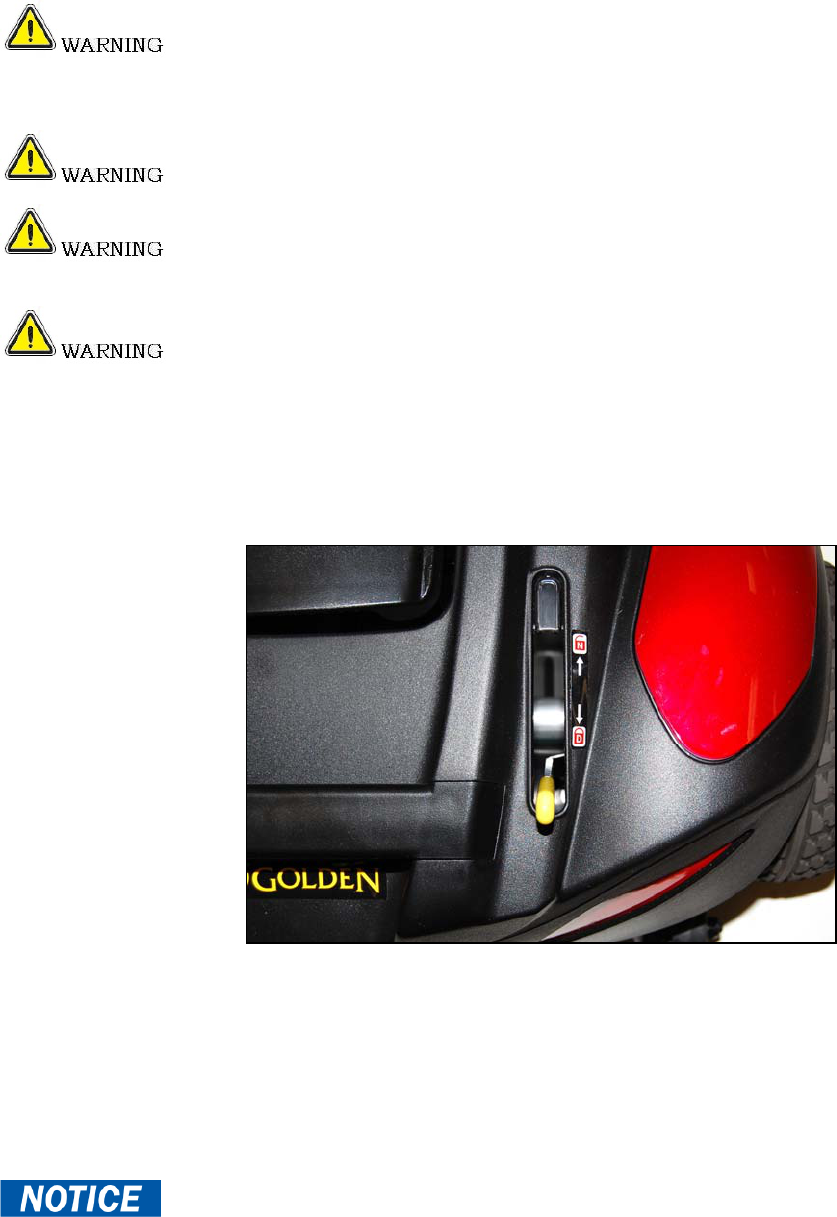
Remove the Seat
1. Place your scooter on a level surface.
Remove the key from the key switch before you begin to disassemble
your Buzzaround XL.
2. (Optional) Loosen the armrest adjustment knobs and remove the arms from the seat.
This will reduce the weight of the seat making it easier to lift.
Never pull on the arms or use them as a handle to move the scooter
as they could inadvertently pull out of the receiver bar causing injury.
3. Grip the seat on opposite sides and, with a firm grip; pull the seat straight up.
See figure 14.
Figure 14. Removing the Seat Figure 15. Removing the Battery Pack
Remove the Battery Pack
4. Lift the battery pack off the scooter. See figure 15.
Remove the Tiller Basket
5. Remove the tiller basket by pulling up.
27
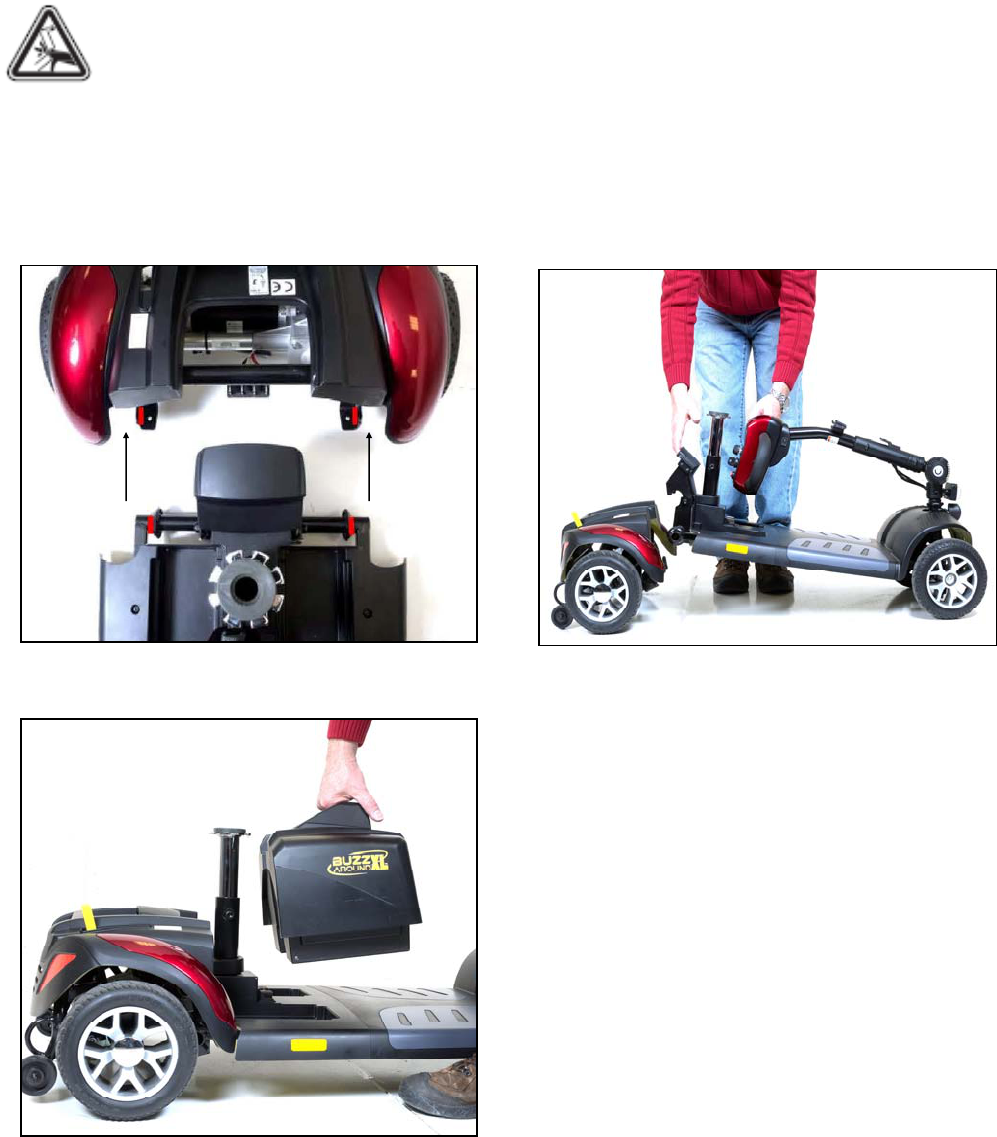
VII. DISASSEMBLY
Fold Down and Lock the Tiller
6. Push in and turn the tiller lock clockwise 90 degrees. See #1 on figure 16.
This will lock the front wheel to keep it from turning side to side to help control while
carrying.
Figure 16. Lowered Tiller
6. Loosen tiller adjustment knob and fold the tiller down flat. See #2 on Figure 16. Then
tighten the adjustment knob to secure the tiller in its new position. Once the tiller is
lowered and locked, you may use it as a handle for easy transportation. Grab it by the
plastic on the tiller. See #3 on Figure 16.
Separate the Drivetrain from the Frame
WARNING! Be careful not to pinch your fingers between the frames. This area is
a pinch-point and requires your full attention.
7. Pull up on the drivetrain release lever with one hand to unlock the front and rear
frame sections. See Figure 17.
8. Pull the front frame up and off of the drivetrain. See figure 17.
Figure 17. Separating the Drivetrain and Frame
1
3
2
28
VIII. ASSEMBLY
WARNING! Be aware of any possible pinch-points when connecting the rear
frame to the front frame. Please note warning labels at pinch-points during
assembly.
WARNING! Pinching and crushing hazard! Increased hazards due to pinching or
crushing result due to the component weight (such as batteries) during
preparation for transport and maintenance work. Always carry out any work to
be done with great care. Always try to get help from a second person, especially
when stowing parts for transport.
WARNING! Pinch Point: A pinch point is an area where you MUST consider
your fingers to be sure they DO NOT become pinched between two metal or hard
plastic areas. The greatest chance of pinch points becomes possible during the
assembly of the Buzzaround XL scooter.
INJURY HAZARD DUE TO IMPROPER ASSEMBLY!
Ensure that all components in the scooter have been correctly assembled. During
assembly, please check that all connecting/locking devices are holding in place.
Figure 18. Buzzaround XL™ Components (Model GB147)
FRONT FRAME
BATTERY PACK
SEAT
TILLER BASKET
DRIVETRAIN
29
VIII. ASSEMBLY
Reinstall the Drivetrain
1. Line up the frame and the drivetrain. See figure 19.
WARNING! WATCH FINGER PLACEMENT! BE CAREFUL NOT TO PINCH YOUR
FINGERS!
2. Lower the frame onto the drivetrain until the drivetrain release lever engages. You
should hear an audible click. See figure 20.
Install the Battery Pack
3. Gently lower the battery pack onto the frame. See figure 21.
Figure 19. Drivetrain Alignment Figure 20. Connecting Frame and Drivetrain
Figure 21. Battery Pack Installation

30
VIII. ASSEMBLY
Raise the Tiller
4. Loosen the tiller adjustment knob and raise the tiller. See figure 22.
5. Tighten the tiller adjustment knob at the desired position.
Figure 22. Tiller Raised
MAKE SURE YOU TIGHTEN YOUR TILLER ADJUSTMENT KNOB
TO BE SURE IT IS SECURED IN THE DESIRED POSITION!
Install the Tiller Basket
6. Place the basket onto the tiller bracket and push down to lock it in place.
See figure 22.
Tiller Lock Knob
Tiller Basket
Tiller Adjustment Knob
Headlight On/Off Switch
31
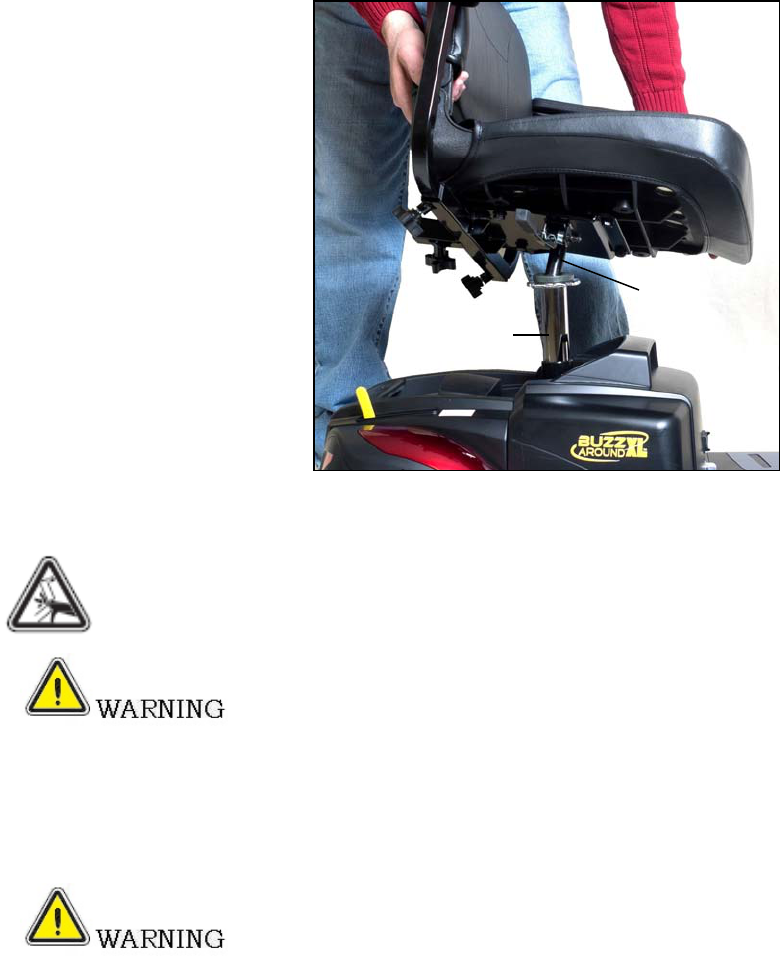
VIII. ASSEMBLY
Install the Seat
7. Hold the seat on an angle so you can see the seat swivel post underneath.
8. Place the seat swivel post into the seat post as shown in figure 23.
9. Push down on the seat to lock the seat in place. Move the seat from side to side to
make sure it is locked in place.
Figure 23. Installing the Seat
WARNING! Pinch Point! Keep hands and clothing clear of the seat swivel post
and seat post.
Accident hazard due to non-engaged seat! Ensure that the seat is
properly engaged by turning the seat slightly left and right.
Unlock the Tiller
10. Turn the tiller lock knob counterclockwise 90 degrees to the unlocked position.
See figure 22 on page 30.
IF YOU DON’T UNLOCK YOUR TILLER LOCK KNOB, YOUR TILLER
WILL NOT TURN! THIS COULD CAUSE INJURY.
Accident hazard due to incorrect seat position! Always turn the seat to face forwards
and engage it before driving. If the seat is in any other position, the possibility of tipping
is increased. Before turning the seat, always ensure that the scooter is on an even and
solid surface.
Seat
Swivel Post
Seat Post
32
IX. TRANSPORTING YOUR Buzzaround XL™
Figure 24. Buzzaround XL™ (Model GB117SHD)
All Golden Buzzaround XL scooters can be equipped with docking devices
for loading onto a vehicle by means of a mechanical lift or hoist. Contact your Golden
Technologies, Inc. provider for more information concerning docking devices and scooter
lift devices.
To Transport Your Buzzaround XL:
• Disassemble or fold down the seat and tiller (see section VII. “Disassembly”) as close as
possible to the loading area of the vehicle to be used for transporting your scooter.
• The degree to which you disassemble your Buzzaround XL or fold the seat and tiller
depends on the size and shape of the cargo area of the transporting vehicle.
• Moving blankets or other forms of padding may be used to protect your Buzzaround XL
during transportation.
• Do not lift your Buzzaround XL by its plastic body parts or dash. Breakage of these
parts is not covered by the warranty.
• Do not use the tires or wheels to lift the rear carriage. The carriage may rotate and
cause injury or damage.
If your scooter and its components are not properly and securely
stowed during transportation, the scooter or the components may move or become
airborne and cause injury or damage.
Never sit on your Buzzaround XL when it is being transported.
Secure with an approved tie-down system.
If transporting your scooter on an outside lift, remove seat or
make sure the seat is as down s e c u r ely with an approved tie-down sys-
tem supplied by your lift manufacturer while a s your s Fail-
ure to do so could result in the seat coming loose and becoming airborne. This
situation could cause problems for the traffic behind you and possibly result in
an injury.

33
X. CARE AND MAINTENANCE
ROUTINE MAINTENANCE
Your scooter requires a minimal amount of care and maintenance. If you do not feel
confident in your ability to perform the maintenance listed below, you can schedule an
inspection and maintenance with your provider.
Make sure your batteries are fully charged daily. See “Battery Charging”.
Regularly inspect your scooter’s tires for signs of wear.
Regularly inspect all exposed harnessing and connections for wear, damage, and
corrosion. Have your provider repair or replace any damaged harness or connector.
Periodically check all fasteners for tightness, wear, and corrosion. If any of these are
present, turn off the scooter and contact your provider.
Be careful of pinch points and sharp metal parts (wear gloves).
Keep all the electrical components (charger, console panel, and electronics) free from
moisture. If any of these items do become exposed to moisture, let them dry
thoroughly before attempting to operate your scooter again.
All bearings are permanently lubricated and sealed. No additional lubrication is
required.
CLEANING YOUR Buzzaround XL™
Tires
Clean the tires with ordinary kitchen-type cleaners and a damp cloth. Do not use
solvents on the tires. Solvents can cause the tire material to break down or become too
soft.
Body
The body (rear fender shrouds (2), nose piece (1), and the console shroud) of your scooter
is formed ABS plastic and is painted for style and durability. Each Buzzaround XL comes
standard with two sets of quick snap color shrouds in Red and Blue. Colors can be
changed by gently snapping off the pieces.
Do not use excess water or pressure when cleaning your scooter.
• Never take your scooter through a car wash.
• Never use a high pressure hose to wash your scooter.
• Use cool water mixed with a mild soap to remove dirt and oils.
• Dry with a clean soft cloth.
• Buff by hand with a soft cloth.
• Do not use a sharp object when removing shroud pieces.
• Clean the body of your scooter with a damp cloth.
Vinyl Seat
Clean with a mild soap or mild detergent and a damp cloth. A vinyl cleaner may also be
used.
34
X. CARE AND MAINTENANCE
IMPORTANT! New batteries MUST be fully charged prior to the initial use of your
scooter. Charge new batteries for 12 hours even if the battery gauge already shows a
full charge. This is to condition your new batteries for maximum performance.
WARNING! Corrosive chemicals contained inside the battery.
Explosive battery conditions exist.
WARNING! Charger surface can become HOT.
Electrical hazard!
BATTERIES AND CHARGING
Battery maintenance is the most important part of maintaining your scooter. Keeping the
batteries fully charged helps to extend battery life. Use the following guidelines to help
keep your batteries in optimum condition.
• For daily use, keep batteries fully charged. We recommend that you plug in the
off-board charger after each use and charge 6-8 hours.
“For best results please charge your batteries overnight after every use.”
• If you are not going to use the scooter for more than a week, fully charge the batteries
and then remove the battery pack from the scooter. See figure 15 on page 26.
Charging Guidelines Checklist to Maximize Battery Life
Use only the automatic off-board charger supplied for all routine charging.
Never use an automotive or wet type charger.
Avoid deep discharges and never drain the batteries completely.
Do not leave batteries in a low state of charge for extended
periods. Charge a discharged battery as soon as possible.
Fully recharge batteries regularly.
Always store batteries fully charged.
Check stored batteries once a month and recharge
as necessary.
To Charge the Batteries:
The charger for all Buzzaround XL models is an off-board
charger. To charge the batteries, plug the charger into the
charger port on the battery pack or on the side of the console.
See figures 25 and 26. When the batteries are fully charged,
disconnect the charger power cord from the wall outlet and
from the charging socket. Note: Your scooter will not move
while the charger remains connected.
Battery Maintenance
MANDATORY! Use only AGM or GEL-cell SLA deep-cycle batteries for operating the
Golden Buzzaround XL scooters.
• These batteries are maintenance free.
• There is no danger of spillage or leakage, so these batteries are safely transportable on
aircraft, buses, trains, etc.
• By following the procedures set out in this manual, you can expect extended life from
our Golden Buzzaround XL’s batteries.
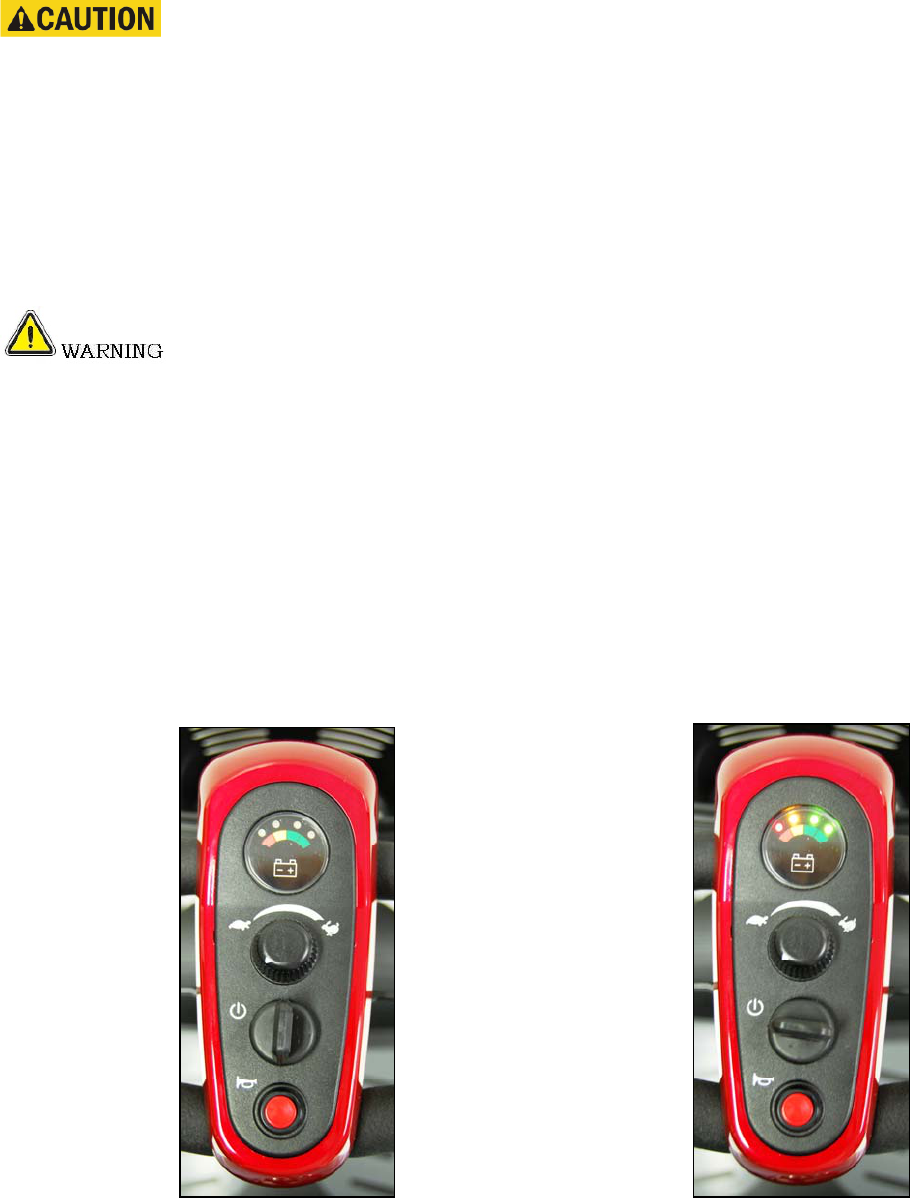
Charger Port
Figure 26. Tiller
Figure 25. Battery Pack
Charger Port
Circuit Breaker
35
X. CARE AND MAINTENANCE
IF YOUR Buzzaround XL™ DOES NOT OPERATE
• Make certain the freewheel lever is set to the engaged position. See page 21.
• Check the main circuit breaker. If necessary, reset the circuit breaker.
See figure 25 on page 34.
• Make certain that the speed adjustment dial is at the desired setting.
• Make certain that the key switch is set to the “On” position.
If none of the above procedures solve the problem, contact your authorized Golden
Technologies, Inc. provider.
MAIN CIRCUIT BREAKER
The main circuit breaker reset button is located on the battery pack. See figure 25 on
page 34.
WARNING! Do not attempt electrical repairs. Consult Golden Technologies, Inc.
or your authorized Golden Technologies, Inc. provider. If, for no apparent reason,
your Buzzaround XL stops operating, the main circuit breaker may have tripped.
Possible causes for the main circuit breaker to trip:
• Driving up a long, steep hill.
• Driving over a curb.
• Run-down batteries.
• Exceeding the maximum weight capacity of the scooter.
As you operate your Buzzaround XL, battery voltages go down and battery current must
rise to satisfy the demands of the motor and of other electrical devices operating on your
scooter. This can cause a heavy current draw that will trip the main circuit breaker.
Remedy:
• Recharge your Buzzaround XL’s batteries. See “Charger and Batteries” in this section of
this manual.
• If the problem continues, have your authorized Golden Technologies, Inc. provider load
test the batteries.
• If the batteries are good, the charger may be the problem. Consult your authorized
Golden Technologies, Inc. provider.
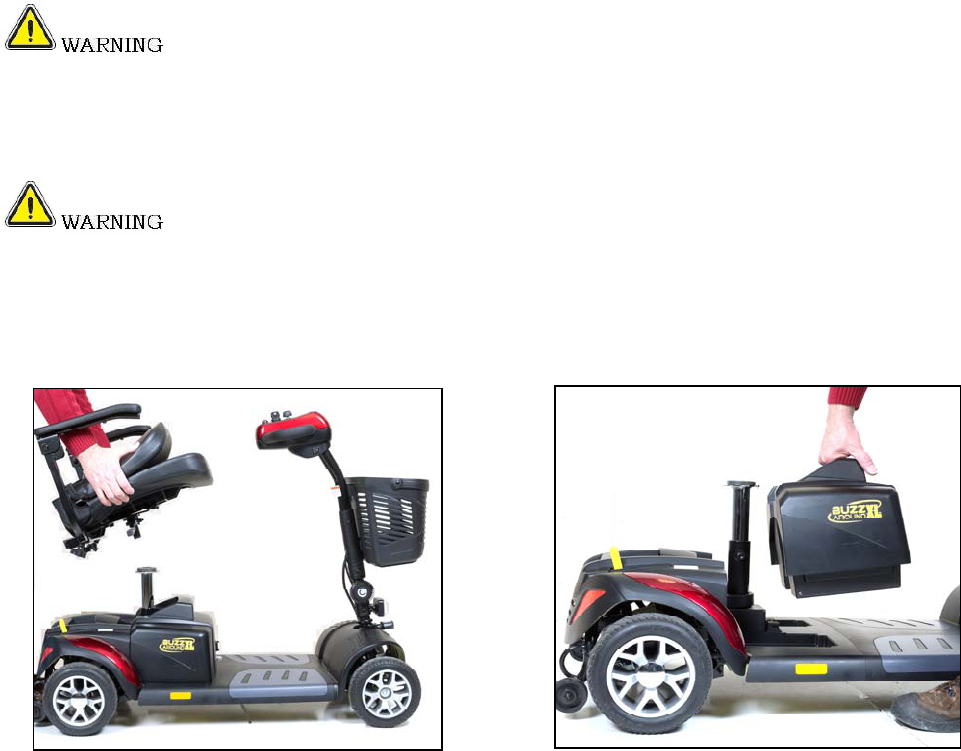
Resetting the Main Circuit Breaker
1. If the main circuit breaker trips as a result of run-down batteries or because of a
temporary overload, reset the circuit breaker:
2. Wait ten minutes or so for the motor control board to return to the normal operating
temperature range.
3. Make certain that the key switch is set to the “Off” position.
4. Press in on the main circuit breaker reset button. See figure 25 on page 34.

36
X. CARE AND MAINTENANCE
If the main circuit breaker continues to trip, there is probably an
underlying electrical fault that needs attention.
• Contact your authorized Golden Technologies, Inc. provider.
• Do not keep resetting the main circuit breaker without correcting the underlying
electrical problem.
DIAGNOSTICS
The diagnostics feature of your Golden Buzzaround XL microprocessor based motor
control board functions as follows:
• Any fault condition with the controller or with an associated system will cause the
battery meter to flash and the horn to beep.
• The flashing of the meter and beeping of the horn occurs as one flash/beep or a series
of flashes/beeps separated by a two-second pause.
• The number of flashes/beeps in each series is referred to as the “Flash/Beep Code.”
• The flash/beep code indicates the nature of the condition or fault.
Flash/Beep Codes
1 Flash/Beep
• Indicates that the battery voltage (with the throttle control lever in the neutral position)
is below the required operating voltage of the scooter.
• The batteries need to be charged.
• Your Buzzaround XL will continue to operate at reduced speeds.
• As the voltage drops you will experience a power loss.
Remedy: Charge your Buzzaround XL’s batteries. See “Batteries and Charging” in this
section.
2 Flashes/Beeps
• Indicates that the battery voltage is too low for the scooter to operate.
• At this voltage your scooter will cease operation.
• If you have charged the batteries and the condition continues, one or both of the
scooter’s batteries may be at fault.
• The continuance of this condition after you have charged your Buzzaround XL’s
batteries may also indicate a problem with the battery charger.
3 Flashes/Beeps
Consult your authorized Golden Technologies, Inc. provider.
37
X. CARE AND MAINTENANCE
4 Flashes/Beeps
• Indicates that the motor control board is overloaded and overheated.
• An overload can occur if you have been driving your Buzzaround XL for an extended
period of time up an incline above the recommended 6 degrees.
• An overload can occur if your Buzzaround XL is carrying a payload that is higher than
the recommended weight capacity of 300 pounds or 325 pounds on the HD models.
• Your scooter will not operate until the motor control board cools back to its operational
temperature range.
Remedy:
• Turn off your Buzzaround XL’s key switch and allow the scooter to sit for 10 minutes.
• Consult your authorized Golden Technologies, Inc. provider.
5 Flashes/Beeps
• Indicates a brake problem.
• The freewheel lever may be in the disengaged position. See page 21.
• The brake or the brake wiring may be damaged.
• For safety reasons, your scooter was designed to cease operation until the problem is
corrected.
Remedy:
• Make certain that the freewheel lever is in the engaged position. See page 21.
• Turn the key switch to the "Off" position to stop the beep code.
• Set the freewheel lever to the “engaged” position.
• Turn the key back to the "On" position.
• If the above remedies do not solve the problem, contact your authorized Golden
Technologies, Inc. provider.
6 Flashes/Beeps
• Indicates that the throttle control lever was not in the neutral position when the key
switch was turned to the “On” position.
• May indicate that the throttle control lever is out of adjustment.
Remedy:
• Turn the key switch to the "Off position.
• Make certain that the throttle control lever is in the neutral position.
• Turn the key switch to the "On" position.
• If the above procedure does not solve the problem, contact your authorized Golden
Technologies, Inc. provider.

38
X. CARE AND MAINTENANCE
7 Flashes/Beeps
• Indicates a problem with the throttle control lever.
• May also indicate a problem with the potentiometer (speed control.)
• Your scooter will not operate until the problem is resolved.
Remedy:
• Make certain that all electrical connections are firmly and correctly joined.
• If the connections are all firmly joined and the problem is not solved, contact your
authorized Golden Technologies, Inc. provider.
8 Flashes/Beeps
• Indicates a motor voltage problem.
• Your scooter will not operate until the problem is corrected.
Remedy: Contact your authorized Golden Technologies, Inc. provider.
9 Flashes/Beeps
• Indicates other internal errors or faults
• Your scooter will not operate until the problem is corrected
Remedy: Contact your authorized Golden Technologies, Inc. provider.
FOR YOUR CONVENIENCE, THESE DIAGNOSTIC BEEP CODES ALONG
WITH THE SERIAL NUMBER OF YOUR SCOOTER CAN BE FOUND UNDER THE
BATTERY BOX. THIS WILL ALLOW YOU TO ACCESS THIS IMPORTANT SERVICE
INFORMATION AT ANY TIME. IF POSSIBLE, PLEASE REFER TO THIS INFORMATION
BEFORE CONTACTING YOUR AUTHORIZED GOLDEN TECHNOLOGIES, INC.
PROVIDER.

39
XI. WARRANTY
Consumer Limited Warranty
Scooters
Golden Technologies has provided information throughout the owner’s manual in regards to proper usage
and care of your scooter. Failure to adhere to this information will void the warranty of the scooter, it’s
parts and the batteries supplied by Golden Technologies.
The following warranty is granted only to the INITIAL Consumer who has purchased our product and
commences on the Date of Purchase by the Consumer from an Authorized Golden Technologies’
Provider. The Consumer must have a warranty registration card filed with Golden Technologies to
receive service.
The warranty covers the following scooter models unless otherwise noted:
Lifetime Limited Warranty:
For the life of the scooter, from the date of purchase from an authorized Golden Technologies’ dealer, in the
event of defective materials or workmanship, Golden Technologies will repair or replace at our option any
of the following structural frame components found to be defective by an authorized Golden Technologies
representative:
*The GR575 is warranted for FIVE YEARS
Two-Year Warranty:
For the period of two years from the date of purchase, in the event of defective materials or workmanship,
Golden Technologies will repair or replace at our option with any new or reconditioned components any of
the following drive train components found to be defective by an authorized Golden Technologies
representative:
Note: An increase in operating noise of the transaxle DOES NOT constitute a defect. With normal
wear and tear, operating noise is expected to increase.
For the period of two years from the date of purchase, in the event of defective materials or workmanship,
Golden Technologies will repair or replace at our option any of the following electronic assemblies found to
be defective by an authorized Golden Technologies representative:
Note: While charging batteries, it is normal for the battery charger to heat up. Heat coming from the
battery charger does not constitute a defect.
One-Year Limited Warranty
For the period of one year from the date of purchase, in the event of defective materials or workmanship,
Golden Technologies will replace the batteries supplied by Golden Technologies if found to be defective by
an authorized Golden Technologies representative.
REV.11.17
BUZZaround LT:
GB107
BUZZaround XL Series:
GB117D, GB117H, GB117Z
GB147D, GB147H, GB147Z
BUZZaround Extreme:
GB118, GB148
BUZZaround LX:
GB119, GB149
LiteRider Series:
GL109, GL111, GL141
All Companion Models:
GC240, GC340, GC440
Avenger: GA541
Patriot: GR575
Steel Frame
Frame Welds
Tiller Frame
Front Fork
Seat Post
Transaxle Motor/Brake Assembly (electrical function only)
Electronic Controller
Battery Charger
Dash Assembly
Potentiometer Assembly
Wire Harness(es)

40
XI. WARRANTY
Consumer Limited Warranty
Scooters (continued)
One-Year Limited Warranty:
For the period of one year from the date of purchase, in the event of defective materials or workmanship,
Golden Technologies will repair or replace at our option any of the following parts found to be defective by
an authorized Golden Technologies representative:
Items not listed are covered at the discretion of Golden Technologies. Any accessories, standard or optional,
supplied by Golden Technologies, are covered for a period of one year from the date of purchase with the
particular unit.
Warranty Exclusions:
Golden Technologies does not provide warranty on any of the following items which may require
replacement due to the normal wear and tear of day to day usage:
This warranty also excludes the following:
Loss or theft of components (ie: keys, baskets, etc.)
Damage caused by:
Battery fluid spillage or leakage
Abuse, misuse, accident or negligence.
Improper operation, maintenance or storage.
Commercial use or use other than normal.
Repairs and/or modifications made to any part without the specific consent of Golden
Technologies.
Exceeding the specified weight capacity of the unit.
Accessories other than those supplied or approved by Golden Technologies.
Failure to adhere to the product instructions
Acts of Nature, such as lightning strikes, earthquakes, etc……
Circumstances beyond the control of Golden Technologies.
ANY PARTS ALTERED OR REPAIRED BY UNAUTHORIZED PERSON.
Warranty Service:
Warranty Service must be performed by an authorized Golden Technologies representative. Golden
Technologies reserves the right to replace warranted part(s) with refurbished or new part(s) at our discretion.
All labor charges, service calls, transportation costs or any other charge(s) associated with the installation of
any warranted part(s) are the responsibility of the consumer. Warranty is for the replacement of the parts only
and does not include freight for the replacement parts. Consumers are not to return any item(s) to Golden
Technologies without prior written authorization. Any damages incurred while warranted part(s) are in
transport are the sole responsibility of the consumer.
There is no other express warranty.
Implied warranties, including those of merchantability and fitness for a particular purpose are excluded.
Liabilities for consequential damages are excluded. This warranty gives you specific rights and you may also
have other rights which may vary from state to state.
REV.11.17
Bearings
Bushings
Seat Swivel Mechanism
Rubber Components
(excludes tires)
Armrests
Plastic Components
(excludes body)
Tires and Tubes
ABS Plastic Shrouds
Armrest Pads
Motor Brushes
Bulbs/Fuses
Brake Pads
Upholstery
41

42
FoldHereFirst
GoldenTechnologies
401BridgeSt.
OldForge,PA18518
FoldHereSecond
Place
Stamp
Here

43
44
401 Bridge Street
Old Forge, PA 18518
Tel: 800-624-6374
Fax: 800-628-5165
www.goldentech.com
Buzzaround XL™ Series_102319
GB117SHD GB147SHD
